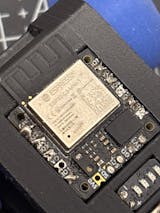
DriveCell is a tiny but powerful device that helps you easily control motors, actuators, and high-power LED lights for your DIY projects. DriveCell makes controlling these components easy, even if you're new to programming or electronics.
In this tutorial we will explain:
What is DriveCell?
Imagine you want to make a small robot and control its motor's speed and direction. This can be complex for beginners and usually would require bulky modules. DriveCell simplifies this process because:
How Does DriveCell Work?
DriveCell utilizes an on-board DRV8837 H-bridge chip to control current flow through the output pins, controlled by the state of the input pins:
The DRV8837 chip provides overcurrent protection, undervoltage lockout, and thermal shutdown features, ensuring safe operation.
Getting Started with DriveCell
Before you can start using DriveCell, you need to set it up and connect it to your project. Here’s a simple guide to get you started:
1. Init()
First we need a basic setup code to get you started:
#include <DriveCell.h> // This line includes the DriveCell library
DriveCell myDriveCell(IN1, IN2); // Replace IN1 and IN2 with your specific pins
void setup() {
myDriveCell.Init(); // Initializes the DriveCell
}
This code tells the DriveCell to start up and get ready to control your motor or actuator. The Init function makes sure all the necessary peripherals are configured.
2. Pulse(bool direction, uint8_t ms_duration)
This command sends a short burst of power in a specified polarity, to quickly energize the actuator and turn it back off.
myDriveCell.Pulse(true, 10); // Short burst for 10 milliseconds
3. Buzz(uint16_t us_buzz)
This makes the actuator vibrate like a buzzer. It’s great for creating sounds for feedback.
myDriveCell.Buzz(100); // Creates a 100us buzzing sound
4. Tone()
This function plays a default tone by making the actuator vibrate at different saved frequencies.
myDriveCell.Tone(); // Plays varying tones
5. Toggle(uint8_t power_percent)
This function simply switches the direction at the full 100% power, which can be useful for reversing the spinning direction of a brushed motor or creating simple flapping movements.
myDriveCell.Toggle(); // Switches direction
By using the CodeCell or any other ESP32 microcontroller, you can also adjust the duty cycle 'power_percent'. For magnetic actuators the 'power_percent' controls the magnetic strength, while for brushed motors this adjusts the speed.
6. Run(bool smooth, uint8_t power_percent, uint16_t flip_speed_ms)
By using the CodeCell or any other ESP32 microcontroller, this function lets you flip the polarity of an actuator or reverse a motor every 'flip_speed_ms' at the duty cycle 'power_percent'. Setting 'smooth' to 1, smooths out the motion, which is ideal when driving the FlatFlap or CoilPad with slow motions (less than 2Hz).
myDriveCell.Run(true, 50, 1000); // Smooth drive at 50% power every 1000 ms
For other Arduino devices, this command makes the motor/actuator flip its direction (forward and backward) at full speed. For example:
myDriveCell.Run(500); // Motor changes direction every 500 milliseconds
7. Drive(bool direction, uint8_t power_percent)
By using the CodeCell or any other ESP32 microcontroller, this function lets you control the speed and direction of your motor. You can make the motor go forward or backward and adjust how fast it goes.
myDriveCell.Drive(true, 75); // Moves forward at 75% power
Examples:
By using any of these functions in a loop, you can create the desired sequence for your motor, actuator, or high-power LEDs. Here's an example where we initialize two dc-motors and drive them at different speeds:
#include <DriveCell.h>
#define IN1_pin1 2
#define IN1_pin2 3
#define IN2_pin1 5
#define IN2_pin2 6
DriveCell Motor1(IN1_pin1, IN1_pin2);
DriveCell Motor2(IN2_pin1, IN2_pin2);
uint8_t mode = 0;
uint8_t speed_percentage = 0;
void setup() {
Motor1.Init();
Motor2.Init();
speed_percentage = 80; /* Set Motor to 80% power */
}
void loop() {
delay(3000);
mode++;
switch (mode) {
case 1:
/* Move forward */
Motor1.Drive(1, speed_percentage);
Motor2.Drive(1, speed_percentage);
break;
case 2:
/* Move backward */
Motor1.Drive(0, speed_percentage);
Motor2.Drive(0, speed_percentage);
break;
case 3:
/* Turn left */
Motor1.Drive(1, speed_percentage);
Motor2.Drive(0, speed_percentage);
break;
case 4:
/* Turn right */
Motor1.Drive(0, speed_percentage);
Motor2.Drive(1, speed_percentage);
break;
case 5:
/* Turn off both motors */
Motor1.Drive(1, 0);
Motor2.Drive(1, 0);
if (speed_percentage < 95) {
speed_percentage += 5; /* Increment speed */
} else {
speed_percentage = 50; /* Reset to 50% power */
}
mode = 0;
break;
}
}
In this next example we use the CodeCell's Proximity Sensor to activate the motors. This sensor will act as a gesture switch, and activate when a hand is within 5cm away.
#include <CodeCell.h>
#include <DriveCell.h>
#define IN1_pin1 2
#define IN1_pin2 3
#define IN2_pin1 5
#define IN2_pin2 6
CodeCell myCodeCell;
DriveCell Motor1(IN1_pin1, IN1_pin2);
DriveCell Motor2(IN2_pin1, IN2_pin2);
uint8_t speed_percentage = 0;
bool on_flag = 0;
void setup() {
Serial.begin(115200); /* Set Serial baud rate to 115200. Ensure Tools/USB_CDC_On_Boot is enabled if using Serial. */
myCodeCell.Init(LIGHT); /*Initializes Light Sensing*/
Motor1.Init();
Motor2.Init();
speed_percentage = 100;
}
void loop() {
if (myCodeCell.Run()) {
/*Runs every 100ms - Put your code here*/
if (myCodeCell.Light_ProximityRead() > 3000) {
/*If Tap is detected shine the LED Yellow for 1 sec*/
myCodeCell.LED(0XA0, 0x60, 0x00U);
Motor1.Drive(0, 0);
Motor2.Drive(0, 0);
delay(1000);
on_flag = !on_flag;
}
if (on_flag) {
/*Move forward*/
Motor1.Drive(1, speed_percentage);
Motor2.Drive(1, speed_percentage);
} else {
Motor1.Drive(0, 0);
Motor2.Drive(0, 0);
}
}
}
If you have any more question about the DriveCell feel free to email us and we will gladly help out!
Soyez le premier informé des nouveaux projets et bénéficiez d'offres intéressantes !