
Menu
Microbots
0
  • Faire
    • Commencer
    • Constructions de créateurs
    • Éducation
  • Boutique
    • ProtoBot
    • Modules Maker
    • Outils et engrenages
    • Robots et écrans
  • À propos
    • Notre histoire
    • Tendez la main
    • FAQ
  • Connexion
  • français
  • Votre panier est vide
Microbots
  • Faire
    • Commencer
    • Constructions de créateurs
    • Éducation
  • Boutique
    • ProtoBot
    • Modules Maker
    • Outils et engrenages
    • Robots et écrans
  • À propos
    • Notre histoire
    • Tendez la main
    • FAQ
  • Langue

  • 0 0

CodeCell: Getting Started with Zigbee

CodeCell C6 is powered by the ESP32-C6, supporting Zigbee, Thread, Wi-Fi 6, and Bluetooth LE. In this guide we’ll focus on Zigbee and how you can use it with CodeCell C6 in the Arduino IDE.

CodeCell C6 Zigbee

What Is Zigbee?

Zigbee is a wireless communication protocol built for low power and reliability. Unlike Wi-Fi, Zigbee is not meant for large data transfers. Instead, it focuses on small messages between devices such as sensors, lights, switches, and smart plugs.

Key characteristics of Zigbee:

  • Low power: Great for battery-powered devices.
  • Mesh network: Each device can relay messages, extending range across a home or building.
  • Reliable: Works well even in environments with lots of Wi-Fi traffic.
  • Smart-home friendly: Used in systems like Philips Hue, Aqara, IKEA TRÅDFRI and many hubs that support Zigbee or Matter bridges.

Zigbee vs Wi-Fi vs Bluetooth LE

  • Wi-Fi: High speed, high power. Best for internet access, web servers, and cloud-connected devices.
  • Bluetooth LE: Short-range, low power. Best for phone peripherals and direct connections.
  • Zigbee: Best for sensors, automation, and smart-home devices. Because Zigbee forms a mesh, you can place small devices around a room or house, and they help extend each other’s range.

If You’re New to Zigbee + Home Assistant

If you’re just starting with Zigbee, one of the easiest ways to experiment is with Home Assistant:

  • Grab a Zigbee USB coordinator like the SONOFF Zigbee USB Dongle (or similar).
  • Plug it into a Raspberry Pi running Home Assistant.
  • In Home Assistant, add the Zigbee integration (e.g. ZHA) and pair your CodeCell C6 as a new device.

This setup makes the USB dongle your Zigbee coordinator, and your CodeCell boards become nodes on that network. 


Arduino IDE Setup for Zigbee on CodeCell C6

Before uploading the example, make sure the Arduino Tools menu is configured for Zigbee on the ESP32-C6. In the Arduino IDE, go to Tools and check:

  • Board: ESP32C6 Dev Module
  • Flash Size: 8MB (64Mb)
    This matches the C6 module’s flash size so the Zigbee stack and your sketch fit correctly.
  • Partition Scheme: Zigbee 8MB with spiffs
    This layout reserves space for the Zigbee stack and NVS while still leaving room for SPIFFS and your application.
  • Zigbee Mode: Zigbee ED (end device)
    This makes the CodeCell behave as a Zigbee end device (sensor, switch, etc.) that joins a coordinator like your Home Assistant dongle.

Once these are set, you can compile and flash the sketch below directly to your CodeCell C6 or C6 Drive.


Example 1 – Zigbee On/Off Light (CodeCell as a Simple Light)

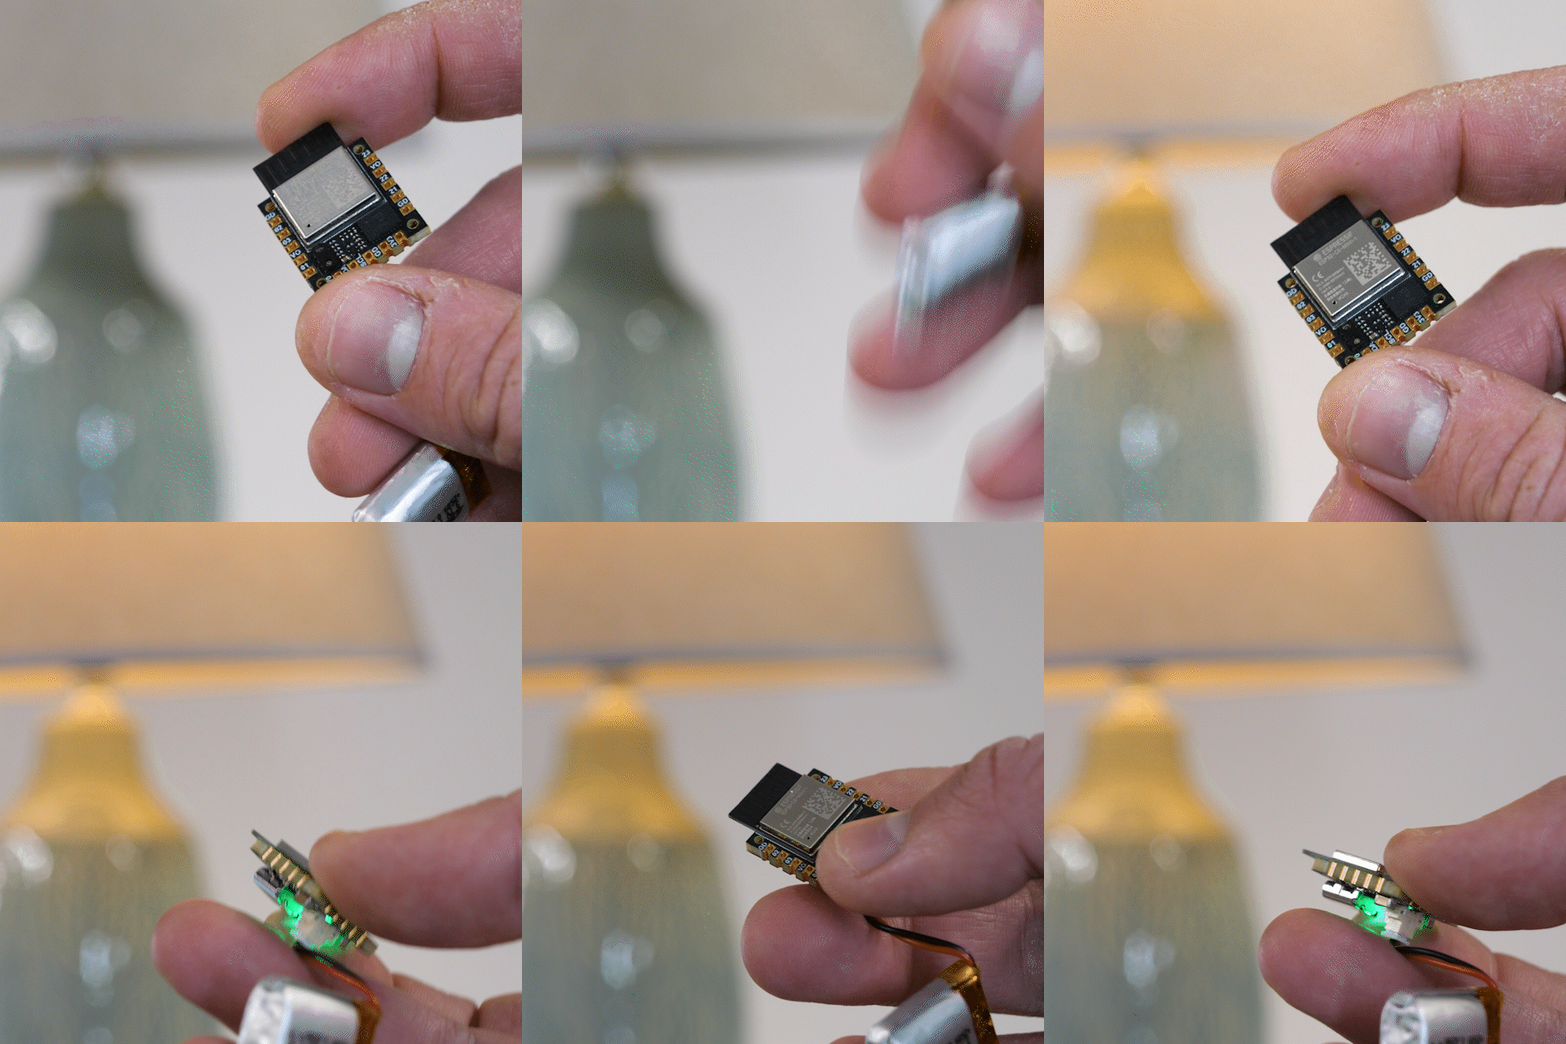
In this example, the CodeCell controls a real lamp using Home Assistant automations:

Home Assistant Zigbee

  • Shake the CodeCell to toggle the lamp ON/OFF
  • Hold your finger near the proximity sensor to enable “brightness mode”
  • Tilt up/down to increase/decrease brightness (while proximity is active)

The CodeCell exposes two Zigbee endpoints:

  • Endpoint 1 (ZigbeeAnalog): a brightness value (0–254) derived from Pitch angle (only when proximity is active)
  • Endpoint 4 (ZigbeeBinary): a binary toggle that flips state on each shake

Important: Home Assistant will receive these as entities, but you still need to create automations that map them to your actual lamp. In our setup we created 3 automations:

  • If shake detected → toggle lamp ON/OFF
  • If tilt up → increase brightness
  • If tilt down → decrease brightness
/*
  Example: CodeCell Zigbee Lamp Control - Tilt-Brightness + Shake Switch
  Boards: CodeCell C6 / CodeCell C6 Drive

  Overview:
  - Endpoint 1 (ZigbeeAnalog): When proximity sensor is pressed, the CodeCell's Pitch angle is mapped to brightness
      Use this value in Home Assistant to set a lamp's brightness.
  - Endpoint 2 (ZigbeeBinary): toggled by a shake gesture, toggles the binary state ON/OFF
      Use this in Home Assistant to turn the lamp on/off.

  Behavior:
  - Press proximity sensor with fingure → proximity detected → "brightness control" is active.
  - Tilt the CodeCell to change Pitch → this updates the brightness value.
  - Remove your fingure → brightness control stops (lamp can stay at last value).
  - Shake the CodeCell → endpoint toggles (can be mapped to toggle lamp automations)

  Required Arduino Tools Settings:
  - Board: ESP32C6 Dev Module
  - Flash Size: 8MB (64Mb)
  - Partition Scheme: Zigbee 8MB with spiffs
  - Zigbee Mode: Zigbee ED (end device)
*/

#ifndef ZIGBEE_MODE_ED
#error "Zigbee end device mode is not selected in Tools->Zigbee mode"
#endif

#include <CodeCell.h>
#include "Zigbee.h"
#include <math.h> 

// Zigbee endpoints
#define ZIGBEE_BRIGHTNESS_ENDPOINT  1   // Numeric brightness value (0–254)
#define ZIGBEE_SHAKE_ENDPOINT       4   // Binary toggle (shake switch)

// Proximity threshold for "brightness control active"
#define PROX_ACTIVE_THRESHOLD       200U   // Adjust to taste

// Pitch → brightness mapping
#define PITCH_MIN_DEG              -45.0f  // Fully down
#define PITCH_MAX_DEG               45.0f  // Fully up

// Shake detection
const float SHAKE_THRESHOLD           = 15.0f;   // Adjust for sensitivity
const unsigned long SHAKE_DEBOUNCE_MS = 800UL;   // Minimum time between shakes

CodeCell myCodeCell;

// Zigbee endpoints
ZigbeeAnalog zbBrightness(ZIGBEE_BRIGHTNESS_ENDPOINT);
ZigbeeBinary zbShake(ZIGBEE_SHAKE_ENDPOINT);

// Motion variables
float Roll  = 0.0f;
float Pitch = 0.0f;
float Yaw   = 0.0f;

float ax = 0.0f, ay = 0.0f, az = 0.0f;

uint8_t lastBrightness           = 0;
unsigned long lastBrightReportMs = 0;
const uint8_t BRIGHT_DELTA_MIN   = 3;      // Minimum change to report
const unsigned long BRIGHT_REPORT_INTERVAL_MS = 300UL;

bool shakeState          = false;      // Toggles ON/OFF on each shake
unsigned long lastShakeMs = 0;

void handleBrightness(uint16_t proximity);
void handleShake();

void setup() {
  Serial.begin(115200);

  // Enable Light + Rotation (pitch) + Accelerometer
  myCodeCell.Init(LIGHT + MOTION_ROTATION + MOTION_ACCELEROMETER);

  myCodeCell.LED(0, 0, 0);//Turn off on-board LED

  // Brightness endpoint (analog-like input) 
  zbBrightness.setManufacturerAndModel("Microbots", "CodeCellC6-PitchBrightness");
  zbBrightness.addAnalogInput();

  // Use Espressif's "percentage" application type so ZHA treats it as a generic level
  zbBrightness.setAnalogInputApplication(ESP_ZB_ZCL_AI_PERCENTAGE_OTHER);
  zbBrightness.setAnalogInputDescription("Brightness level (0–254) from Pitch angle");
  zbBrightness.setAnalogInputResolution(1.0f);
  zbBrightness.setAnalogInputMinMax(0.0f, 254.0f);

  // Shake endpoint 
  zbShake.setManufacturerAndModel("Microbots", "CodeCellC6-ShakeSwitch");
  zbShake.addBinaryInput();
  zbShake.setBinaryInputApplication(BINARY_INPUT_APPLICATION_TYPE_SECURITY_MOTION_DETECTION);
  zbShake.setBinaryInputDescription("Shake to toggle");

  // Register endpoints with Zigbee core 
  Serial.println("Adding Zigbee endpoints (brightness + shake)");
  Zigbee.addEndpoint(&zbBrightness);
  Zigbee.addEndpoint(&zbShake);

  // Start Zigbee
  Serial.println("Starting Zigbee...");
  if (!Zigbee.begin()) {
    Serial.println("Zigbee failed to start, rebooting...");
    ESP.restart();//If not connected - reset esp32
  }

  Serial.println("Connecting to Zigbee network...");
  while (!Zigbee.connected()) {
    Serial.print(".");
    delay(100);
  }
  Serial.println("\nZigbee connected!");
}

void loop() {
  if (myCodeCell.Run(10)) { // Run sensors at 10 Hz
    
    uint16_t proximity = myCodeCell.Light_ProximityRead(); // Read proximity first (to know if brightness control is active)

    // Read rotation (roll, pitch, yaw)
    myCodeCell.Motion_RotationRead(Roll, Pitch, Yaw);

    // Handle brightness control using Pitch when proximity is active
    handleBrightness(proximity);

    // Handle shake-based toggle
    handleShake();
  }
}

/**
 * Handle brightness control:
 * - If proximity is above threshold, use Pitch to map to brightness 0–254.
 * - Sends brightness to Zigbee as analog input.
 * - LED shows brightness using green channel.
 */
void handleBrightness(uint16_t proximity) {
  unsigned long now = millis();

  if (proximity < PROX_ACTIVE_THRESHOLD) {
    // No hand close → brightness control not active
    myCodeCell.LED(0, 0, 0);  // LED off
    return;
  }

  // Clamp pitch and map to 0–254
  float pitchClamped = Pitch;
  if (pitchClamped < PITCH_MIN_DEG) {
    pitchClamped = PITCH_MIN_DEG;
  }
  else if (pitchClamped > PITCH_MAX_DEG) {
    pitchClamped = PITCH_MAX_DEG;
  }
  else{
    //skip
  }

  // Normalize Angle
  float normalized = (pitchClamped - PITCH_MIN_DEG) / (PITCH_MAX_DEG - PITCH_MIN_DEG);
  if (normalized < 0.0f) {
    normalized = 0.0f;
  } else if (normalized > 1.0f) {
    normalized = 1.0f;
  }
  else{
    //skip
  }

  uint8_t brightness = (uint8_t)(normalized * 254.0f);

  // Only report if changed enough or enough time passed
  if ( (abs((int32_t)brightness - (int32_t)lastBrightness) >= (int32_t)BRIGHT_DELTA_MIN) ||
       (now - lastBrightReportMs >= BRIGHT_REPORT_INTERVAL_MS) ) {

    lastBrightReportMs = now;
    lastBrightness = brightness;

    zbBrightness.setAnalogInput((float)brightness);
    zbBrightness.reportAnalogInput();

    Serial.print("Pitch: ");
    Serial.print(Pitch);
    Serial.print(" deg -> Brightness: ");
    Serial.println(brightness);
  }

  // Visual feedback: LED green = brightness level
  myCodeCell.LED(0, brightness, 0);
}

/**
 * Handle shake detection:
 * - Read accelerometer.
 * - If total acceleration crosses threshold (and debounce passes),
 *   toggle a Zigbee binary endpoint.
 */
void handleShake() {
  unsigned long now = millis();

  myCodeCell.Motion_AccelerometerRead(ax, ay, az);
  float totalAcceleration = sqrt(ax * ax + ay * ay + az * az);

  if (totalAcceleration > SHAKE_THRESHOLD && (now - lastShakeMs) > SHAKE_DEBOUNCE_MS) {
    lastShakeMs = now;

    // Toggle internal state
    shakeState = !shakeState;

    Serial.print("Shake detected! New switch state: ");
    Serial.println(shakeState ? "ON" : "OFF");

    // Update and report binary input (shake switch) to Zigbee
    zbShake.setBinaryInput(shakeState);
    zbShake.reportBinaryInput();
  }
}

How It Works

  • Brightness control: When your finger is close to the proximity sensor (value above PROX_ACTIVE_THRESHOLD), the CodeCell maps Pitch to a brightness value (0–254) and reports it via ZigbeeAnalog.
  • Shake toggle: A shake gesture toggles a boolean state and reports it via ZigbeeBinary. Home Assistant can use that change as a trigger.
  • Home Assistant automations: Use the CodeCell entities as triggers/inputs, then control any lamp entity you want (smart bulb, smart plug, etc.).

Other Basic Zigbee Examples You Can Try

  • Zigbee Light Switch
  • Zigbee Color Light (Control Color & Brightness)
  • Zigbee Proximity Presence Sensor
  • Zigbee Motion Sensor (BNO085 Motion State)

Try modifying thresholds, report intervals, or combining multiple endpoints in one sketch, and you’ll quickly have your own custom Zigbee devices running on CodeCell C6.

  • Partager:

Partage

Github

  • À propos
  • Logiciel
  • Éducation
  • Contact
  • FAQ
  • Termes
  • Politique de remboursement
  • politique de confidentialité

Soyez le premier informé des nouveaux projets et bénéficiez d'offres intéressantes !

© 2026 Microbots.

★ Reviews

Let customers speak for us

67 reviews
Write a review
85%
(57)
6%
(4)
1%
(1)
3%
(2)
4%
(3)
62
21
C
CodeCell C3
Cloke74

Great piece of kit, had just what i needed to complete the project i had in mind. Shame shipping to the UK is so expensive, but appreciate this isn’t necessarily in the hands of MicroBots

A
CodeCell C6
Anonymous

I had an issue, got a red light, I used too much flux. Support said clean it, then the one sensor worked fine. I got the help and answer same day I provided a foto.

A
CodeCell C6 Drive
Anonymous

I think this is the best of the ESP offered, most versatile.

User picture
P
CodeCell C6
Prudhvi tej Chinimilli

Been testing the Microbots CodeCell C6 and honestly impressed with how much functionality they packed into such a tiny module. Great form factor for rapid prototyping wearable/embedded sensing applications. ESP32-C6 + IMU integration makes development much easier compared to building everything from scratch.

Still exploring battery optimization and compact LiPo options for our use case, but overall the platform is promising for low-cost real-time sensing systems. Excited to keep building with it.

F
CodeCell C6
Francisco Estivallet

Amazing hardware, my go to for compact projects.

User picture
123